Sunday, November 18, 2012

Amigurumi Birthday Cake. Want to Make One Too?

About a month ago, after seeing the little cupcakes that I had created, my son challenged me to make a cake for an upcoming birthday. Silly son, did he forget that I am always up for a challenge? :D And so, I present to you my versatile celebration cake!


I did not attach the decorative fruit toppings, thinking different things could be made for different occasions.You could make crochet icing roses or little chocolate kisses, or even do cross stitch names and greetings for the top!  Also, there is storage compartment inside the cake so the fruit and candle can be kept in there. Or, it makes a terrific toy for a little one who enjoys hosting tea parties for his or her stuffed animals or dolls.

I looked for patterns to make this, and found many patterns for cake slices, and an angel food cake, but I wanted more of a layer cake and I could not find a pattern for that, so I just went ahead and invented my own. I decided on chocolate, but of course it could be made in cream for a vanilla cake, red for a red velvet cake, orange for a carrot cake etc, -- any colour (flavour) you would like. You could even make one for a bridal shower in white with pretty roses to decorate it. Make a few tiers of varying sizes and you would have a keepsake for the bride to be to keep! (If you are going to have multiple layers, I would make sure to use something on the bottom layers to keep the sides firm -- see below --- and I would also put stuffing in to help support the layers on top) The top layer would not need to be as strong though)

The top is just a large crochet circle ..... magic ring, sc 6, join. chain1 2sc in each around the top. For the next round ( sc in first st 2sc in next) continue this pattern for the round. Next round ... sc in next 2 st then 2sc in next, continue in this pattern, increasing number of stitches between the 2sc in 1st for each row. I wanted it to be a little wavy on top rather than really flat so I did a few rows of extra 2sc, if that makes sense to you. (Every 3rd or 4th row I did not do the increase in the number of sc before the 2sc in 1 st). My cake is about 18 cm (7 inches) in diameter, but it can be made any size you like!

Once you have the desired size for the top, sc around using the back loops only. After the initial round, crochet into the full previous sc. I continued the icing colour for about 2 cm (1 inch) then I did a row of 2sc in first st, chain 2, 2sc into next st, chain 2 etc around the cake,  into the FRONT of the st only. This was to  make the icing "drip",  Cut the yarn and change to the cake colour now, and crochet into the back of the stitches behind the dripping icing.


I crocheted 4 rows (all around the cake 4 times with the cake colour), then I added a row of strawberry jam---- do not cut the yarn, just leave it for the time being and join on the jam colour. Working in the front of the loops only, as with the icing drip ..... do 2sc in first stitch, 3sc in next and continue this pattern all the way around. ss to join, then cut the jam colour and weave in the ends. Go back and pick up the main cake colour again, and work in the back of the loops (behind the jam colour) and continue to sc all the way around. I did 3 rows of sc then I added a layer of cream filling. Leave the cake colour without cutting, join on the cream colour, and again, work in the front of the loops only, do 2sc in each stitch all the way around. Ss join and cut the cream colour, weave in ends. Go back to the cake colour and work in the back of the loops, continue to sc until the cake is as tall as you want it to be. Mine is about 10 cm ( 4 inches) high. Do a ss all the way along the bottom edge (this gives you a strong base to use to attach the plastic, see directions below)


Make the base plate for the cake by crocheting a large, but this time FLAT circle at least 3 rows wider than the top of the cake. (Mine is 3 rows wider, but you could make a larger plate if you like). The edge of the cake follows the pattern  (5dblcr in first stitch, skip a stitch, ss in next, sc in next). Repeat this pattern all the way around for a picot edge on the plate.


To keep the cake standing straight, cut some plastic canvas (you can get this at the dollar store, I had some already here so I just used it, but it is easy to find). Measure the circumference of the cake very carefully, and the height of the cake and cut a rectangle of the plastic to fit perfectly. Join the short edge of the plastic so you have a tube. Put the plastic inside the cake, then use a darning needle and cake colour to whipstitch through the plastic and the bottom (inside of the cake) sc all the way around. For extra strength, and in case this is going to be a toy for a little one, I also used the cake colour and attached the plastic to the cake near the top edge with a running stitch though the cake and plastic. If the cake is used to store the decorations or other treasures, I did not want them to get stuck between the cake and the plastic, but that is probably not necessary.


Centre the cake on the base, and oversew the edge of the cake to the plate. I made sure I just picked up the top of the loop on the plate so the stitches do not show through to the bottom of the plate, but that is just my preference. I like the little finishing touches like that! If the cake is going to be used to store things, do not sew all the way around. I left about 22 cm (9 inches) open so the cake opens up to reveal a secret compartment! LOL


I crocheted little fruits and a candle to put on top, but did not attach them. You could easily sew them on for a permanent decoration if you like. The fruits are just crocheted circles in the fruit colours, then folded in half and sewn together. I embroidered little seeds or such to make them a little more lifelike. I have an orange segment, a lemon, lime, kiwi, watermelon, and a few strawberries. There is also a tiny banana hidden in there. I decided not to put stuffing in the fruit as the crochet is firm enough to "fluff" them out if I wanted them to be more 3D than flat, but a little stuffing would not have hurt.  Have fun with designing the fruit toppings! There are several patterns for strawberries on the internet, I just wing it for myself. You could make some icing flowers instead of the fruit if you wished, or any other things you want to decorate the cake with. I made a candle by crocheting a small rectangle, to fit over a plastic straw. Put the rectangle over the straw and whipstitch along the long edge. Cut the straw slightly shorter than the covering, and sew the bottom and top closed so the straw does not fall out. I made a little flame to sew on the top. Again, I just winged it .... about 3 sc, turn, do about 3 rows, then decrease by crocheting all stitches together and do a sc for the point of the flame. Turn and ss all the way to the base to make the flame stronger. Sew the flame onto the candle. My candle will stand well if supported by the fruit, but if you are only going to put candles on the cake, you may need to secure them or make some kind of base for them.


Have fun, that is what this whole hobby is about for me! It gives me a lot of pleasure to see how things turn out, and I like to try different things as I am creating.

This is not a true pattern, I know, it is just some easy directions if you are tempted to try your hand at making your own celebration cake!

My abbreviations .... sc single crochet, ss slip stitch, dblcr double crochet
It is very basic crochet, nothing overly fancy about it!

Thursday, November 15, 2012

Burger and Fries Play Food

A test amigurumi for Heather. More details to follow. I will include the link to the pattern once it is available if anyone is interested in making it as well!


Burger, on whole wheat bun, with cheese, tomato, and pickle toppings, and a side of fries!
This is a fast project, and very cute. 

A view of the inside toppings.


I meant for this to be a side view, but it appears the Playbook was upside down! I will have to see if I can save it on the computer and rotate it. 


I invented a piece of lettuce to put on mine as well, but this was not part of the test. 
I can't help myself, I get carried away with things at times!
I also remade the pickle in a larger size, just to be on the safe side if a little one is going to be playing with the burger. I suppose you could fasten the layers together through the centre, but that might take away some of the play value. If it is just for display, that would be an option I suppose. 


Vince wants to know why I did not make some ketchup for the fries and mustard for the burger too! LOL Hmm, maybe that will happen later today! I am so baddddd when it comes to suggestions like that!

Sunday, November 4, 2012

Poncho, vest or pullover once again

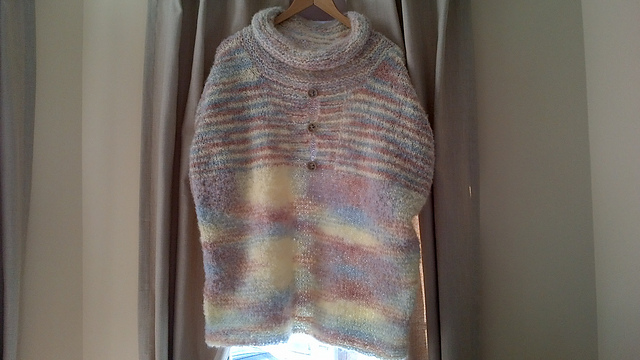
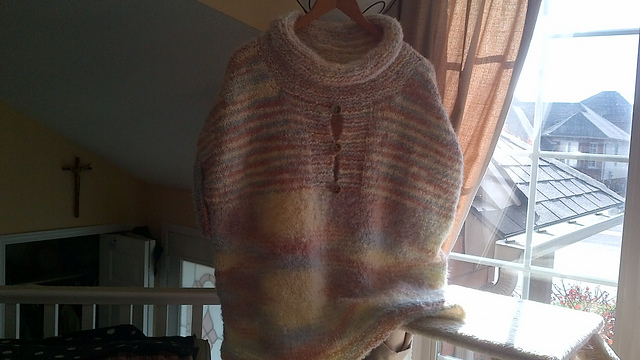
Another test knit pattern. This one is very easy yet looks very classy. Or rather, it looks very classy when a solid colour is used for it and some great buttons. I opted for a more casual look, using mohair boucle (70 % mohair and 30 % PAC ... I have no idea what PAC is, but I suspect it is basically an acrylic added to the mohair). I followed the directions exactly and was very happy with the fit of the finished poncho, except for the cowl neck. It seems I do not have much of a neck, lengthwise. That is not really news, as I have never liked turtlenecks or cowl necks on things. So, after it was completed and I had signed off on the test, I took the neck down 3 inches so it is more suitable for me. I will make this one again, I am sure.


These are pictures of the original neckline. It still folds over now, but it is not a rolling cowl.


I discovered the cats all like mohair as I was knitting it as well, as they kept sneaking over to steal the skein of yarn if it fell on the floor, or they would pull the sweater off of the chair if I left it out while I was working on it and I would find one of them sleeping on it on the floor later on! I am making them a few cat toys with the left over mohair, as they seem to be drawn to it!


The colours on this have always appealed to me. As I was knitting it, I was reminded of a blouse that I had when I was about 13. I don't remember how I first saw it, but it was in a fancy ladies wear shop. I imagine it was out on the sidewalk for a summer sale or some such event because it is not the kind of store I would ever have gone into just to browse, let alone buy anything. I fell in love with this blouse when I first saw it, but it was far too expensive for me (I think it was originally about $60 and it was marked down to $40). I was never much of a fancy dresser, and most of my clothes when I was young came from Sears (they were special clothes for me) or Eatons catalogues. There were not very many stores in Collingwood for everyday clothes way back then! LOL

This blouse was beige, pink, and blue, in a leafy pattern, but very subtle. It was just a plain blouse, no ruffles or frills or anything, and it had buttons part way up the back. I don't know what fabric it was, but I imagine it was silk or a silk blend. It was supposed to be dry cleaned, so it was, for me, a very luxurious fabric.

Back to the story ... I went into the shop so many times to check if they still had it, hoping the price would get lowered so I could buy it. I decided if it was every reduced to $25 I would splurge and buy it. That was a lot of money when I only earned $1 an hour at my after school job. It took a few months, but eventually the blouse was reduced further, and the big moment arrived when I made the decision to buy it for myself.  That blouse was so special to me, I don't think I even wore it very often (but I did wear it, that I remember!) I still had it when I went away to university, but what happened to it later on I have no idea. But, I remember it still. And the colours of this sweater reminded me of that part of my life!

Saturday, October 27, 2012

Snowflake Sweater

Another pattern from the test knit group. This one I really enjoyed making! It is also sized all the way from 6 months to ladies XXL, so I think I will also make one for myself after I finish the things I have already committed to in my mind. No live models, so I improvised with teddy bear, who was a most willing model. It was either that, or a large stuffed cow! LOL Maybe she will be the next model.


Lots of other info about this one on my Ravelry project page. It was a fast knit and it turned out wonderfully. I hope to do others by this designer in the future too (and it is a Canadian design team to boot!)

Monday, October 22, 2012

Time for some Sweet Treats!

Continuing the food creation, some tarts, cupcakes and other sweets have taken shape. It is as much fun creating possible flavours for them as it is in creating them!
More treats to come .... I would like to have several dozen of them to send to the nurses at dialysis for a little Christmas treat. They also make lovely little toy food for serving at tea parties!

Birthday cupcake in double chocolate, complete with candle and child safe "flame"


The cupcake case is removable too! :D


Mmmmm Strawberry Parfait
Black Forest Tart
Mocca with Rum ball topping and chocolate drizzle
Pumpkin with a dollop of whipped cream
Strawberries and Cream
Peach Parfait with mini Cannolli topping


Let your imagination run wild!  :D 


Thursday, October 18, 2012

Angelfish Shawl is Finished


I finished blocking the shawl last  night, but since the designer has not made the larger shawl herself, I did not know how large to stretch it for the blocking process. The final size for me, as I did the blocking, is 24 inches by 48 inches.  I am not sure if it is the yarn or the blocking, but the pattern does not really POP like I think it should. Maybe it is the colour. I DO like the final product and the yarn was wonderful to work with, I just am sorry it does not show off the design for the designer. But, she just wanted the pattern checked for errors and clarity so those parts I did fulfil well for her.
I intended to model it myself, but my assistant photographer is not very good (and he is also in bed sleeping!) so I took the pictures hanging instead. I hoped the red behind would enhance the design but not so much so. Oh well.

Monday, October 15, 2012

Smiley Snake Toy

This is another pattern that I tested in the pattern test group. 
It is supposed to have a wire inside it so it can be posed.
But I used some old oxygen tubing inside it so it still has body, and it coils nicely. I could not see putting a length of wire inside a toy for any age group. No matter how much padding you put around it, there is a big chance of the wire poking through. Originally I planned to put the wire inside the tubing, but when it came to that point I could not find my wire. And that was a huge search! I have no clue where I put it, but I have a large package of craft wire, somewhere, in this house!
It is cute. But, I think the hat is a little to girlish .... I try not to stereotype, but I can't see too many little girls wanting a toy snake. Maybe they do. So, after I took the pictures and posted my final comments on the toy, I took the hat off so now it is a unisex toy. A cowboy hat might be more suitable than a sunhat. What do you think?